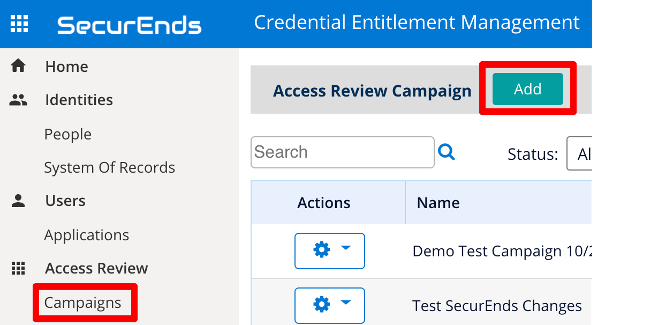
Adding a New Campaign
- Navigate to Campaigns in the left-hand menu and select the Add button.
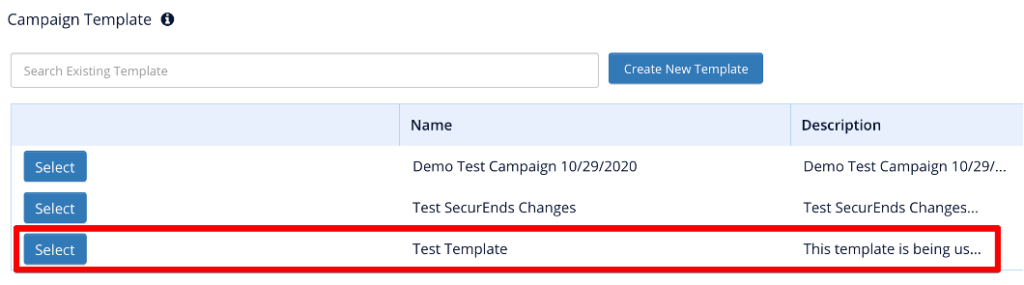
- After selecting Add, the below screen will populate with your templates. Select the desired template to begin. You can use the search button to find a template if there are many templates in the view.
- Note: After selecting a template, a warning message may appear on the bottom of the UI. For testing purposes, this does not hinder moving forward, but if this message is encountered while creating a Production campaign, the cause of the warning will need to be investigated.

Customizing Your Campaign

- Campaign Name
- This is the unique name to identify the campaign.
- Start Date
- This will be the target date to begin the campaign.
- NOTE: Campaigns are not automatically kicked off on the start date. An Admin will need to enter the system and manually launch the campaign.
- This will be the target date to begin the campaign.
- End Date
- This is the target end date for the campaign.
- NOTE: The campaign does not close on this date. It will not close until an Admin enters the system and closes the campaign.
- This is the target end date for the campaign.
- Delta Campaign
- For the delta campaign type, once you refresh the application data with a sync/import, you create a delta campaign using the same template used in the previous campaign. Only new credentials found in the application data or if an existing credential has a new entitlement will show in the delta campaign results. There is no dependency on the SOR data.
- Yes – Created campaign is based on changes since the previous campaign.
- NOTE: Cannot utilize a delta campaign as a first campaign
- No – Will run a full-scope campaign (scope is defined in template section).
Campaign Reviewer
- This section provides a combination of individuals that can be selected to perform the review of the campaign. A description for each role can be found below:
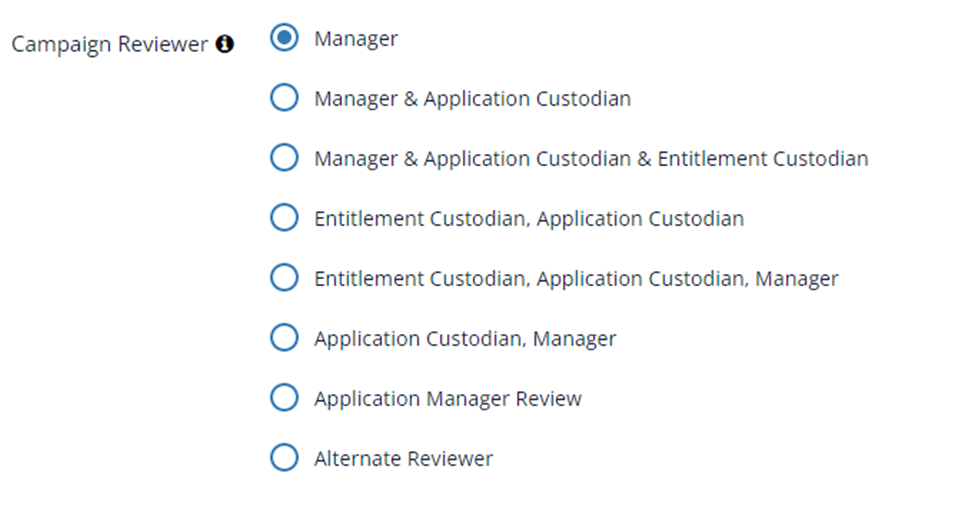
- Select who want to perform Access Review from the Campaign Reviewer options.
- Manager is the person’s direct manager assigned in system of record. If the user does not have a Manager defined in the People view then the review will go to the Default Reviewer.
- Application custodian is the person who reviews all users of an application. This person can be assigned by clicking the gear icon (actions button next to application), select More and then select Custodian. Important – Each application can have its own Custodian and will need to be setup for each application.
- Entitlement custodian is the person who reviews all users associated to an entitlement. This person can be set up by clicking the gear icon (actions button next to application) and selecting Entitlement. Then once again, select the gear icon and select Custodian. Important – Each Entitlement will need to be setup with a Custodian. If this Campaign Reviewer type is selected and an Entitlement does not have a Custodian and the review will default to the Default Reviewer.
- Alternate Reviewer can be any other user whom you want to perform Access Reviews. Must be present within the People view.
- Select Manager – if you want Access Reviews performed by the person’s direct manager. The Manager review will review application credentials and entitlements.
- Select Manager & Application Custodian – if you want both the Manager AND the Application Custodian to perform Access Reviews. This option will trigger two independent reviews. If the application does not have an Application Custodian defined, the review will default to the Default Reviewer.
- The Manager review will review application credentials and entitlements.
- The Application Custodian will only review application credentials, not entitlements.
- Select Manager & Application Custodian & Entitlement Custodian – if you want Access Reviews to be performed by the users Manager AND the Application Custodian AND the Entitlement Custodian. This option will trigger 3 independent reviews. If the application does not have an Application Custodian defined, the review will default to the Default Reviewer. If the entitlements within the application does not have an Entitlement Custodian defined, the review will default to the Default Reviewer.
- The Manager review will review application credentials and entitlements.
- The Application Custodian will only review application credentials, not entitlements.
- The Entitlement Custodian will only review application entitlements and not credentials.
- Select Entitlement Custodian, Application Custodian – elections will be created for review by entitlement custodian for each entitlement where entitlement custodian is assigned. If entitlement is not assigned to a custodian, or there are self-reviews, these entitlement custodian elections will be reviewed by application custodian. If Application Custodian is not assigned, entitlements that were not reviewed by Entitlement Custodian will be skipped. If there are any self-reviews for application custodian, they will be skipped.
- The Entitlement Custodian will only review application entitlements and not credentials.
- The Application Custodian will only review application credentials, not entitlements.
- Select Application Custodian, Manager – If the Application Custodian is assigned, elections will be created for review by Application Custodian. If there are self-reviews, they will be moved to the Manager. If Application Custodian is not assigned, no application custodian reviews will be created.
- This is a credential only review. No entitlements.
- Select Application ManagerReview – The managers are defined within the application data which you imported. This option is only available with CSV imports. This manager option will override any manager designations coming from the System of Record. If Application Manager is not assigned, the review will go to the Default Reviewer.
- This will review application credentials and entitlements.
- Select Alternate Reviewer – if you want another user to perform all the reviews for the campaign.
- Enter email of the person in prompted text box.
- The Alternate Reviewer will review application credentials and entitlements.
Campaign Reminders
- Emails can be sent to the assigned reviewers and the manager of the reviewer to remind them that they still have elections within a campaign which need action. The email to the reviewer’s manager is an escalation email, the reviewer’s manager does not have any reviews to complete.
- Below are the options for email reminders that can be sent.
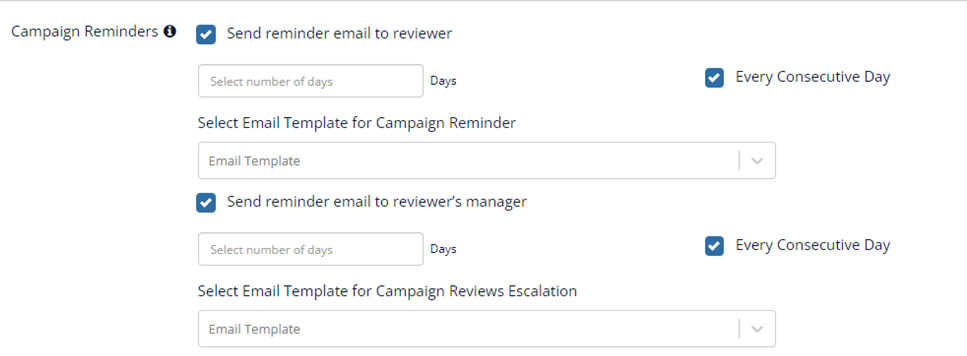
- Send reminder email to reviewer
- This will send an email to all reviewers that have an open campaign which are not 100% completed.
- NOTE: When a reviewer has completed 100% of their campaign, they will no longer receive the reminder emails.
- This will send an email to all reviewers that have an open campaign which are not 100% completed.
- Select Email Template for Campaign Reminder
- You have a choice to utilize the default Campaign Reminder email template or one that you may have created. If you have created additional reminder templates, they will all appear in the dropdown list.
- Send reminder email to reviewer’s manager
- This will notify the manager of any reviewer that has not completed their portion of a campaign they are involved in.
- Select Email Template for Campaign Reviews Escalations
- You have a choice to utilize the default Campaign Escalation email template or one that you may have created. If you have created additional escalation templates, they will all appear in the dropdown list.
- NOTE:
- “Select number of days” refers to the number of days from the end date of the campaign. This end date was provided when the campaign was created.
- “Every Consecutive Day” when checked, will send a reminder email every day leading up to the end of the campaign (assuming the selected party has not completed their task).
- Consider the following example:

- For example – A Campaign end date of 12/11/2020, a campaign reviewer with an open campaign and users still to perform reviews against, will receive a reminder email on 12/9/2020 and every day until 12/11/2020 or until they complete the review.
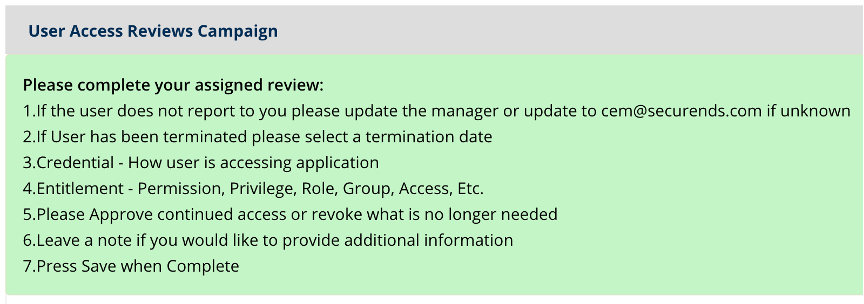
Campaign Instructions
- There are the default campaign instructions which are displayed to the reviewers at the top of a campaign.
- These instructions will be shown for all campaigns unless you decide to use a ‘Custom’ instruction. The Default Campaign instructions can be edited (see below).
- From the dropdown, select to use the either the “Default” instructions, or “Custom” created instructions.

- Default
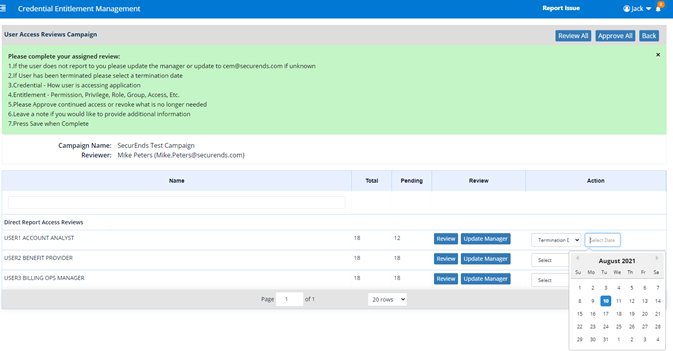
- When a reviewer accesses an open campaign, they will be displayed the instruction in a green box at the top of the page.
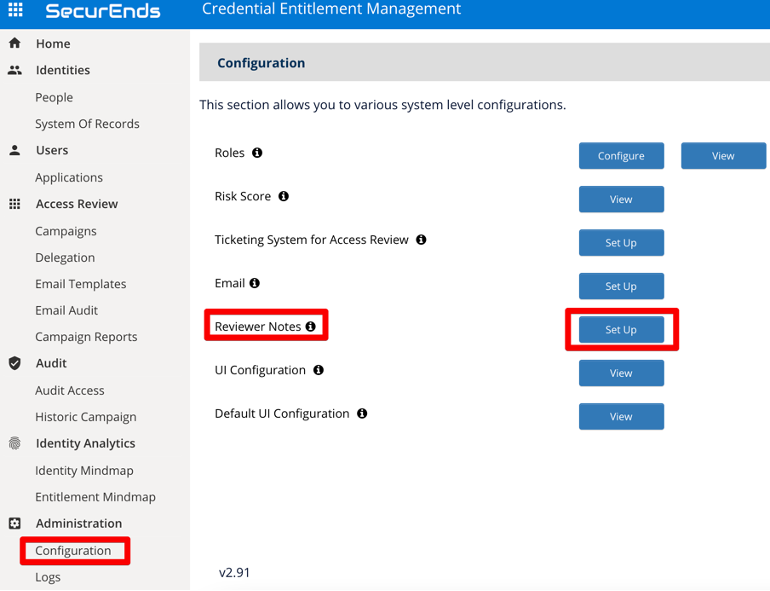
- To Edit the Default Instructions, you can access those from the Administration->Configuration->Reviewer Notes
- Custom
- These instructions can be edited to include any steps desired.
- Note – once you ‘Save’ the campaign, these instructions cannot be updated.

Launch Campaign
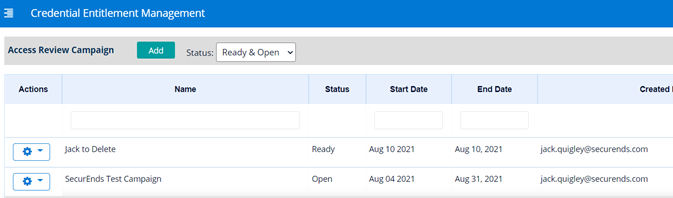
- Once you ‘Save’ a newly created Campaign, you will be presented with a list of Campaigns which are in ‘Ready’ status. You can Launch a campaign from the Launch button if needed. SecurEnds recommends that you go to Campaign->Gear icon Action->View first before launching. This allows the creator to visually inspect a few reviewers first to ensure the campaign has the correct scope.

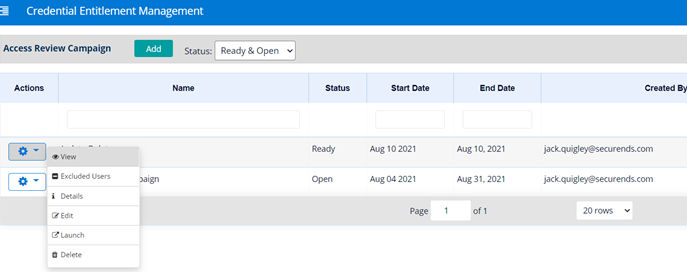
- You can also Launch a Campaign from the Action Gear icon
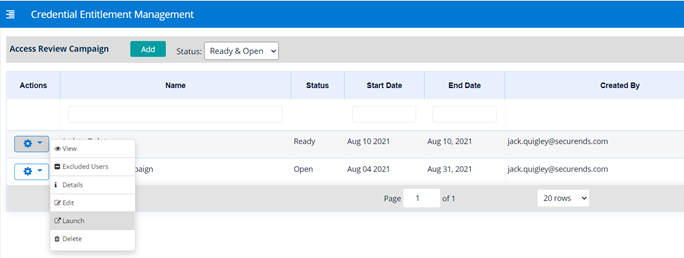
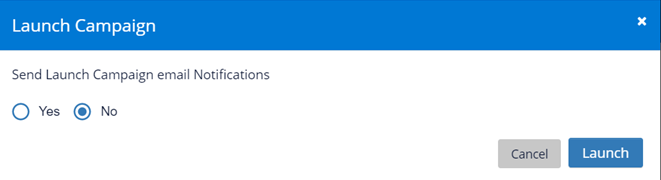
- Click on Launch option beside the campaign name, a pop up will appear to walk you thru the email options for the campaign. These emails are independent from the Campaign Reminder emails you setup when you created the campaign.
- No – The Launch Campaign email will not be sent to all the reviewers
- Yes – All reviewers and delegates will be sent a Launch Campaign email
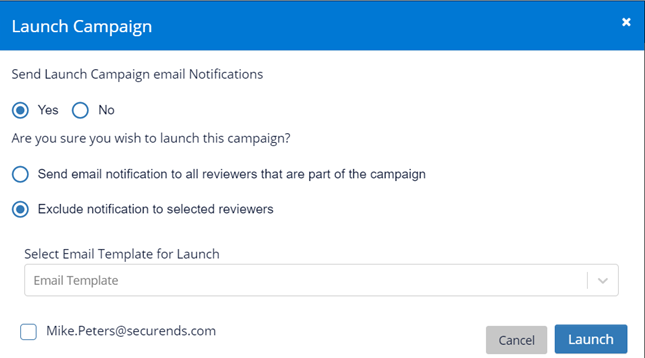
- When selecting Yes, you will be provided with additional email options just to be sure.
- Option 1, will send the Launch Campaign email to all reviewers.
- Option 2, you can exclude certain reviewers from getting the Launch Campaign email. A list of all managers will appear below the template selection. You will need to select the check box manually for those whom you do not want to receive this email. Depending on the size of the campaign, you can have a lot of reviewers.
- You have the option to select the Launch Campaign email template to use for the campaign. If you created your own Launch Campaign email template, you can select it here.
- On successful launch of campaign, The status of the campaign now changes to Open.
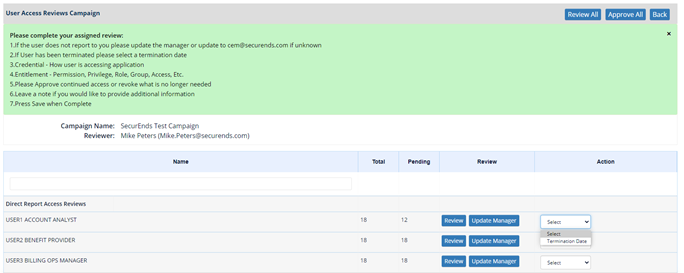
- Once the campaign status changes to Open, reviewers can perform User Access Reviews.
- Once the campaign is Open, a SecurEnds Admin has several options. From Campaigns->Action Gear icon .
- Select View to see how reviewers are progressing with the campaign. You can View a Reviewers detail by selecting View.
- Select Review to see the elections done for that user.
- Select Update Manager to change who can do the review. This will not change the manager for the System of Record.
- The SecurEnds admin’s will get notified of a manager change. But the new manager who becomes the reviewer does not get notified unless there are campaign reminders configured to be sent out or if the Admin uses the “Remind” option to manually remind folks of pending elections (view the Remind feature below).
- Select an Action from the drop down to provide a Termination Date for the user.
- This will remove the elections from a Reviewer’s campaign scope.
- Select View to see how reviewers are progressing with the campaign. You can View a Reviewers detail by selecting View.
- Other options include:
- Select Excluded Users to see who was excluded from the campaign. Most users who “fail” to fall under a Review Type will default to the Default Reviewer. In the event that this requirement fails, excluded users will show with this action. Do not confuse this with the Bulk Exclude action at the application level.
- Note: Users in a campaign who fail to default to the Default Reviewer as a last resort, most likely are reviewing themselves. Setting up a Campaign Restriction can allow this user to review themselves and be included in the campaign. But this must be done before a campaign is created.
- Select Details to see all the Campaign information
- Select Edit to modify the Campaign Name and/or the Campaign End Date. The Start Date is not editable since the campaign has been launched.
- Select Close to end the campaign. The SecurEnds Admin can do this at anytime. The campaign is not considered complete unless the Admin manually closes the campaign. Once in a Closed status, you have the ability to Re-Launch a campaign. All Launch Campaign email options will again be presented and will only apply to those reviewers who are not 100% complete.
- Select Remind to send all reminder emails to all reviews who are not yet 100% complete with their reviews. You will have an option to Copy the reviewer’s manager.
- Select Delete to remove the campaign. You will lose all data for the campaign so select this option wisely.
- Select Excluded Users to see who was excluded from the campaign. Most users who “fail” to fall under a Review Type will default to the Default Reviewer. In the event that this requirement fails, excluded users will show with this action. Do not confuse this with the Bulk Exclude action at the application level.

- Delegations
- There are 2 types of delegations that can be made: People Delegation and Credential Delegation. The Credential Delegation need to be in place before you create a campaign. The People Delegation needs to be in place before you launch a campaign.
- People Delegation
- When it is known that the original reviewer will not be available for a User Access Review, the SecurEnds Admin can delegate the reviews to another individual. This will not remove the original reviewer from the User Access Review or receiving campaign emails, delegation will simply allow another user to view and perform the User Access Reviews on behalf of the original reviewer. If enabled, both parties will receive an email that there has been a delegation for an upcoming review.
- Assigning a delegation needs to be in place before you launch a campaign.
- If a delegation needs to be made in the middle of the campaign, the Admin will need to close the campaign, put the delegation in place and then re-launch the campaign.
- You can use the Delete action to remove the delegate at any time.
- When it is known that the original reviewer will not be available for a User Access Review, the SecurEnds Admin can delegate the reviews to another individual. This will not remove the original reviewer from the User Access Review or receiving campaign emails, delegation will simply allow another user to view and perform the User Access Reviews on behalf of the original reviewer. If enabled, both parties will receive an email that there has been a delegation for an upcoming review.
